Generating Synthetic Data with LLMs
A guide to using AI to generate synthetic data for your database and application using any LLM that is available at an endpoint.
May 21st, 2024

Yes, this is a blog about logging users out of an application. Why, might you ask? Well, it's harder than one might think. The purpose of this blog is to detail the journey I went through to figuring out how to log a user out and the bumps that were hit along the way.
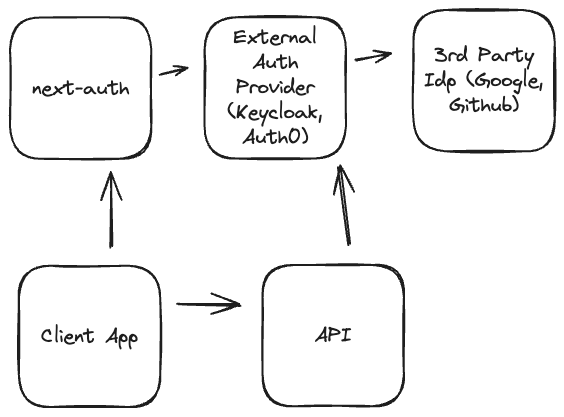
As Neosync is an open source app, I've strived to build it in such a way that leaves it open for others to configure how they see fit, mostly. Today, Neosync can be configured to run in an auth or un-auth mode. The problem with auth mode is that everyone does things a little differently, or has their own auth provider. Next-auth is a popular library that acts as an auth system for Next.js based applications. Neosync uses this for the application frontend to give a standard interface for authentication interactions. Next-auth supports plugging any OIDC-based authentication system like Keycloak, Auth0, and more.
However, because Neosync has other services that run outside of Next.js, we can't solely rely on it, or rather, we don't want to solely rely on next-auth to be our single authentication system. For that, we use an external auth provider (imagine something like Keycloak as an external authentication service.)
This works great, but introduces an extra layer of session persistence.
When a user logs in to the application, there are now >=2 layers of sessions that are now being managed by different layers of authentication systems.

The first layer is the next-auth layer itself. This handles persistence via a cookie to the client app, and stores the JWT that was created when the user logged in to the external auth provider.
This is effectively a centralized auth store. It can either contain user/pass configuration, or be further a configuration space for 3rd party identity providers like Google, Github, Corporate Logins, etc.
Google, Github, etc, can be seen as the final resting space for user identity, but this can get wild and be an even further chain of deference. OIDC can be crazy.
Ok, so the user has finally landed on the login page, chosen their preferred way of logging in, has successfully logged in, done what they came to do, and want out.
Not so fast, how the heck do we do that? Well, next-auth provides a fancy signOut function you can call when the user clicks Log Out on the web page. That's all that needs to be done, right? right?
Well, as far as next-auth is concerned, when the user clicks logout, it clears the cookies from the user's browser session and washes its hands of all else that needs to be done. What comes next though is often a little bit of a surprise. The callback url might redirect the user back to the app's home page, or maybe the marketing site. The user navigates later back to the app, but find they have already been logged in! How is this possible? Well, most likely the case is that the external auth provider still has an active session. Next-auth routes the user to the auth provider, they hand back their active session, next-auth creates a new browser session, and the user never sees the login page. Great! Well, maybe not if they intended on using a different set of credentials.
Auth0 actually has a great blog on why it's not so easy to log users out of an application, and was a source of inspiration for this one. Now that I've yammered on about the setup process and my journey in finding this out myself, I'm going to detail how I accomplished a logout that involves signing the user out of next-auth, as well as the external auth provider (but not a 3rd party IdP like Google).
Okay, so up next here is a few different code snippets, of which I'll detail their importance.
At the time of writing this blog, Neosync is using next-auth@5.0.0-beta.4, which changes quite a bit of how the handling of things are done and adds a lot of support for the app router that was introduced in Next.js@13.
To properly sign someone out of an OIDC provider, the user's identity token must be provided as a part of the logout. There are a few tricks you can use if that isn't the case, but for the purposes of this blog, that is how we will be accomplishing this feat.
So this bit of code shows how next-auth is setup and how we can configure the user's identity token to be saved in the session cookie for later use.
The two callbacks we implement are session and jwt
The jwt callback allows us to have access to the auth provider's access token on initial login, and store that on the next-auth token. The session callback gives us the ability to transfer what we stored on the next-auth token to the session object.
The session object is accessible later on both the server and client.
Next-auth encrypts this token and stores it in browser cookies.
export const {} = NextAuth({
  providers: [...(your - providers)],
  session: { strategy: 'jwt' },
  callbacks: {
    session: async ({ session, token }) => {
      session.accessToken = token.accessToken;
      session.idToken = token.idToken;
      return session;
    },
    jwt: async ({ token, account }) => {
      if (account) {
        // this is important and what allows us to transfer it to the session in the callback above.
        // the account object is only populated on initial login
        token.idToken = account.id_token;
        token.accessToken = account.access_token;
        // ... other stuff you want to store on the next-auth token
      }
      // .. other stuff you want to do like refresh the access token, or any other login you want to invoke on the next-auth session.
    },
  },
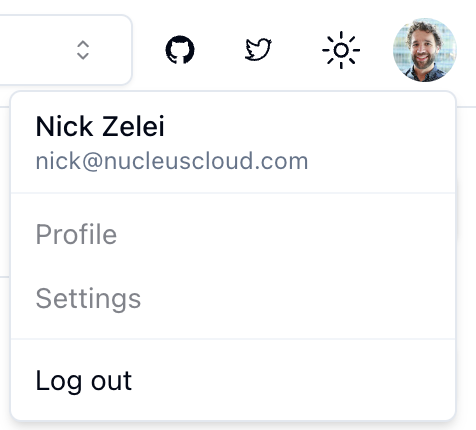
});Imagine we have a top nav somewhere with a user icon that contains a logout button. Maybe it looks a little something like this:

What does the code for this logout button look like?
import { signOut, useSession } from 'next-auth/react';

export default function Logout(): ReactElement {
  const session = useSession();
  const callbackUrl = `/api/auth/provider-sign-out?idToken=${session.data.idToken}`;
  return (
    <Button
      onClick={async () => {
        await signOut({
          callbackUrl: callbackUrl,
        });
      }}
    >
      Log out
    </Button>
  );
}
Great, so what is this doing exactly?
Well, the signOut function is a next-auth method that simply clears the next-auth cookies from the browser session. That handles signing the user out of the app's browser session.
After that succeeds, it invokes the callbackUrl, which for our purposes, routes the user to a route that we've defined above called provider-sign-out. We pass the identity token we saved in the session earlier along as a query parameter.
What is this thing, and what does it do?
This is the last piece of the puzzle, and is where all of the magic happens that will finally let the user actually sign out of your application and be met with that glorious login screen.
Let's take a peek at what it looks like:
// /api/auth/provider-sign-out/route.ts
import { NextRequest, NextResponse } from 'next/server';
import { auth, getLogoutUrl } from '../[...nextauth]/auth';

// This is potentially important depending on your route setup
export const dynamic = 'force-dynamic';

export async function GET(req: NextRequest): Promise<NextResponse> {
  const nextauthUrl = process.env.NEXTAUTH_URL!;
  try {
    const { searchParams } = new URL(req.url);
    const session = await auth();
    const idToken = session?.idToken ?? searchParams.get('idToken');

    if (!idToken) {
      console.error('there was no auth session');
      return NextResponse.redirect(nextauthUrl);
    }
    const logoutUrl = await getLogoutUrl();
    if (!logoutUrl) {
      throw new Error('unable to locate logout url');
    }
    const qp = new URLSearchParams({
      id_token_hint: idToken,
      // Needed for OAuth logout endpoint
      post_logout_redirect_uri: nextauthUrl,
    });
    return NextResponse.redirect(`${logoutUrl}?${qp.toString()}`);
  } catch (error) {
    console.error('unable to redirect to provider logout', 'error: ', error);
    return NextResponse.redirect(nextauthUrl);
  }
}
What is this thing doing?
Well, simply put, it tries to pull the identity token either from the session or from the query parameters. Because we already logged the user out of next-auth, there will be no session, and the route relies on the identity token being present in the query.
We then call a function to compute the logout url, construct the query parameters that it expects to exist, and redirect the user to that url! When the user hits the auth provider's logout function, it signs them out of the auth provider (along with clearing even more cookies for that domain), and finally redirects them to the post_logout_redirect_uri, which in our case, is the client-app (but could be somewhere else, wherever it is that you want users to land when they log out of your application).
Whew! That is a lot. I left out the function that magically calculates the logout url.
That is going to be different via IdP, but generally most OIDC-compliant providers surface a logout url that can be found in the /.well-known/openid-configuration configuration. The key is the end_session_endpoint. Some providers have this disabled by default and must be enabled to properly calculate it.
Thanks for making it to the end of this blog. Talking about logging users out of an application is about as boring as it gets. However, the complexity can be quite interesting from a technical perspective when really thinking deeply about it.
Check out the resources section below for more information on this issue, particularly the github issue if you'd like to commiserate with other souls about this open topic.
If you'd like to see this code in a working example, you can check out Neosync and peak into the auth directories to see most of the same code that was written in the above sections of this post.
I wanted to note a final few thoughts regarding little tweaks in this setup that are of importance. This problem was hard to debug because many things I tried worked beautifully when trying them out on localhost. However, once deployed into a production environment, no longer worked correctly. I believe this had to do with how Next-auth works and how it stores cookies in a production-like environment. I never dug too deeply into this, but the github discussion below does a little more.
Why do you need export const dynamic = 'force-dynamic'; in the provider sign out method?
This has to do with the use of req.url in the request. You'll find that you can delete it and everything works fine when running it locally with next dev, but you'll be met with a broken build when it comes time to next build. This has to do with the dynamic nature of the route and it's use of req.url. Depending on where your route is located (if it's nested under a dynamic folder path), you may not need this exported constant. However, if your route, like Neosync's is a static path, you will need to tell Next to force this route to by dynamic so it can properly access the url in a dynamic fashion.
Depending on your production setup, if you're hosting the Next.js app behind a load balancer, the session cookie may below your header size past the default settings.
We ran into this with nginx and had to scrounge to find the correct settings to increase the allowed header size.
For us, we had to update the nginx proxy-buffer size to this:
proxy-buffers: 8 16k
proxy-buffer-size: "32k"
There is a stack overflow link in the resources below that talks more about these settings.
getLogoutUrl code that we use to automatically get this URL based on the configured OIDC provider.
A guide to using AI to generate synthetic data for your database and application using any LLM that is available at an endpoint.
May 21st, 2024

What is the best way to protect sensitive data in LLMS - synthetic data and tokenization? We take an in-depth look at the two options.
April 23rd, 2024
